If you’re searching for the best way to level up your gameplay with mods, optimized setups, and standout visuals, you’re in the right place. Gamers today want more than just playthrough tips—they want deeper customization, smarter performance tweaks, and insider strategies that actually make a difference.
This article is built to meet that exact need. We break down the latest gaming trends, practical modding techniques, and performance-enhancing tweaks that help you get more from your favorite titles. Whether you’re exploring custom game skins creation, refining your loadouts, or optimizing your hardware for smoother FPS, you’ll find clear, actionable guidance here.
Our insights are grounded in hands-on testing, active community feedback, and ongoing analysis of what’s working right now in the gaming scene. Instead of recycled advice, you’ll get up-to-date strategies and tech-focused enhancements that align with what serious players are actually using today.
Let’s dive into the tools, tactics, and trends that give you a real competitive edge.
Your Vision, Your Character: The Ultimate Guide to Custom Game Cosmetics
Standard skins are fine—until everyone else is wearing them too. So instead of settling, let’s build something unmistakably yours. This guide goes beyond basic recolors and shows where most tutorials stop short.
First, understand the tiers of cosmetic design:
- Texture swaps (editing surface images)
- Mesh edits (altering a 3D model’s shape)
- Full asset imports (entirely new items)
However, tools alone aren’t the edge. The real advantage? Optimizing polygon counts and UV maps so your design runs smoothly in-game (yes, performance matters).
With the right workflow, custom game skins creation becomes less guesswork—and more controlled, creative precision.
Gearing Up: The Modder’s Essential Toolkit
First things first, every modder needs image editing software. This is the backbone of custom game skins creation—where textures are tweaked, recolored, and refined. GIMP (free and open-source) is a solid starting point, while Adobe Photoshop (paid) offers advanced layering and smart object tools (think “director’s cut” control over your visuals).
Next, if you want to build assets from scratch, step into 3D modeling. Blender is the go-to powerhouse—free, flexible, and backed by a massive community. Alternatively, 3ds Max or Maya bring industry-grade polish, the Avengers of modeling software.
However, tools alone aren’t enough. Many games require specialized programs to unpack and repack files.
| Game | Tool |
|---|---|
| Cyberpunk 2077 | WolvenKit |
| Bethesda Titles | Creation Kit & community tools |
Finally, community hubs like Nexus Mods and Discord servers keep you updated (and sane). Pro tip: always check pinned messages before asking questions.
Your First Mod: Mastering the Art of the Reskin
Finding the Right Files
Every reskin starts with locating the correct texture files inside the game’s directory. Most PC games store assets in folders labeled textures, characters, or packaged archives like .pak files. Think of this as A vs B: manually digging through folders (slower but educational) versus using a file explorer tool built for the game (faster, cleaner, less guesswork). The second option usually saves hours.
Look for common formats like .dds, .tga, or .png. These are image files the game wraps around 3D models—like gift wrap on a box (except the box punches zombies).
The Extraction Process
Extraction tools convert packaged files into editable images. Some games require official mod kits; others rely on community tools. Official tools are safer but limited. Community tools offer flexibility but may break after updates. Choose based on stability vs freedom.
Pro tip: Always duplicate original files before editing. One misplaced save can crash the game.
Editing and Customization
Open the texture in your image editor. You’ll see a flattened layout called a UV map—a 2D blueprint showing how the image wraps onto a 3D model. Color channels control red, green, and blue values, while normal maps fake surface depth (that stitched-leather look without extra polygons).
Mini-tutorial: To recolor a jacket, adjust Hue/Saturation. To add a logo, paste it on a new layer aligned to the UV section for the chest area. Save in the original format.
This is where custom game skins creation becomes addictive.
Saving and Repacking
Repack edited textures using the same tool you extracted with. Compare:
- Wrong format → glitches or crashes
- Correct compression + naming → seamless in-game swap
Test, tweak, repeat. (Yes, you’ll forget a file once. We all do.)
Leveling Up: Creating Custom 3D Models and Assets
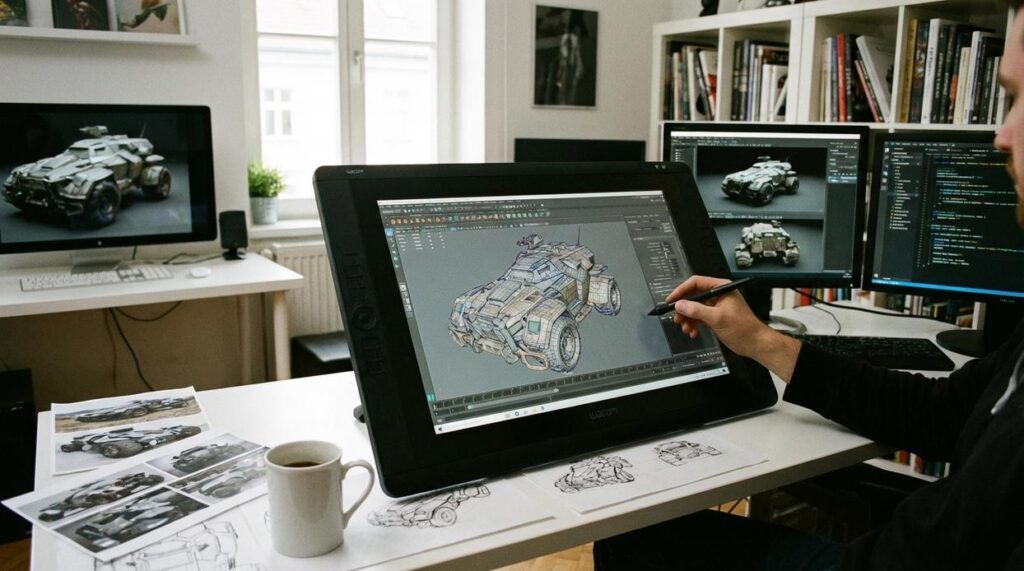
From Concept to Creation
Every great asset starts with a simple idea. Maybe it’s a sci‑fi sword sketched on paper or a rough digital doodle. From there, you move into a block-out—a basic 3D shape version of your idea built in Blender or a similar program. Think of it as building with LEGO before carving marble.
Sketch-first vs. freestyle modeling? Sketching gives you direction and consistency. Freestyle modeling can feel creative, but it often leads to proportion issues (and a lot of undoing). In most cases, a quick concept drawing saves hours later.
Modeling Fundamentals
Once your block-out feels right, refine it using core tools:
- Extrusion: Pulling faces outward to add depth.
- Beveling: Softening hard edges for realism.
- Subdivision surfaces: Smoothing geometry by increasing polygon density.
Low-poly vs. high-poly modeling is a key comparison. Low-poly assets are performance-friendly and ideal for games. High-poly models look stunning but can strain systems if not optimized. Pro tip: Start high-poly for detail, then bake details onto a low-poly version for efficiency (a common AAA workflow).
Texturing Your New Model
Next comes UV unwrapping, which flattens your 3D model into a 2D layout so textures fit correctly. Poor UVs cause stretching—like printing a face on a crumpled balloon.
Creating textures from scratch gives full control, especially for custom game skins creation. Alternatively, pre-made texture libraries save time but may lack uniqueness. Choose based on your project goals.
Rigging and Weight Painting (Briefly)
If your asset needs movement, attach it to a skeleton through rigging. Weight painting controls how much each bone influences the mesh. Automated rigs are faster, but manual adjustments deliver cleaner animation.
Finally, always test in-engine and resolve issues early—especially by reviewing guides on troubleshooting common mod conflicts and errors.
Going Live: Importing and Sharing Your Creations
The Import Process
To replace an existing in-game item, use the game’s approved modding toolkit (for example, Bethesda’s Creation Kit or Unreal Engine asset injectors). Import your mesh or texture, match the original file name or FormID, and rebuild archives (.BA2, .PAK, or similar). In Skyrim Special Edition, that usually means repacking through Archive.exe and verifying load order in LOOT (yes, load order still matters). If you’re into custom game skins creation, double-check texture compression formats like BC7 to avoid ugly artifacts.
In-Game Testing
Never skip testing. Seriously.
Checklist:
- Texture alignment (no stretching)
- Model clipping with armor or terrain
- Proper LOD rendering
- No FPS drops or crashes
Test in high-traffic cells like Whiterun or Novigrad marketplaces (busy areas expose issues fast).
Sharing with the Community
Upload to platforms like Nexus Mods. Use clear screenshots (daylight + combat pose), write concise install steps, list dependencies, and respond calmly to bug reports (someone will find one). Pro tip: version your updates clearly to avoid confusion.
Unleash Your Creativity: What Will You Build Next?
You’ve mastered the basics. Now it’s time to build something unmistakably yours. The era of settling for default gear is over (good riddance). With custom game skins creation, you move from player to creator—reshaping textures, models, and effects to fit your vision.
Some argue mods are cosmetic fluff. But personalization boosts immersion and long-term engagement (see ESA player motivation reports).
Start small, think big:
- Recolor a favorite weapon
- Tweak lighting or particle effects
- Share your build for feedback
Pro tip: document every iteration. Today’s tweak could spark tomorrow’s signature style and identity.
For gamers looking to elevate their experience, mastering the art of creating custom skins and textures can be a game-changer, especially with the latest updates discussed in our article on Scookiegear, which open up even more creative possibilities – for more details, check out our Latest Updates Scookiegear.
Level Up Your Game With Smarter Mods and Customization
You came here to figure out how to stay ahead of the latest gaming trends, optimize your setup, and unlock the full potential of mods. Now you know how the right tweaks, performance upgrades, and custom game skins creation can completely transform your experience.
The frustration of lag, outdated visuals, or generic gameplay setups is real. Playing at your best is nearly impossible when your gear and mods are holding you back. With the right strategies and enhancements, you’re no longer just playing the game — you’re mastering it.
Now it’s time to take action. Start upgrading your setup, apply the modding techniques you’ve learned, and experiment with custom game skins creation to stand out in every lobby. Thousands of gamers are already optimizing their builds and seeing real performance gains.
Don’t settle for average gameplay. Upgrade your setup, implement the right mods, and take control of your competitive edge today.
 Noelsonics Christiansen has opinions about platform play strategies. Informed ones, backed by real experience — but opinions nonetheless, and they doesn't try to disguise them as neutral observation. They thinks a lot of what gets written about Platform Play Strategies, Tech-Enhanced Game Mods, Hot Gaming Trends is either too cautious to be useful or too confident to be credible, and they's work tends to sit deliberately in the space between those two failure modes.
Reading Noelsonics's pieces, you get the sense of someone who has thought about this stuff seriously and arrived at actual conclusions — not just collected a range of perspectives and declined to pick one. That can be uncomfortable when they lands on something you disagree with. It's also why the writing is worth engaging with. Noelsonics isn't interested in telling people what they want to hear. They is interested in telling them what they actually thinks, with enough reasoning behind it that you can push back if you want to. That kind of intellectual honesty is rarer than it should be.
What Noelsonics is best at is the moment when a familiar topic reveals something unexpected — when the conventional wisdom turns out to be slightly off, or when a small shift in framing changes everything. They finds those moments consistently, which is why they's work tends to generate real discussion rather than just passive agreement.
Noelsonics Christiansen has opinions about platform play strategies. Informed ones, backed by real experience — but opinions nonetheless, and they doesn't try to disguise them as neutral observation. They thinks a lot of what gets written about Platform Play Strategies, Tech-Enhanced Game Mods, Hot Gaming Trends is either too cautious to be useful or too confident to be credible, and they's work tends to sit deliberately in the space between those two failure modes.
Reading Noelsonics's pieces, you get the sense of someone who has thought about this stuff seriously and arrived at actual conclusions — not just collected a range of perspectives and declined to pick one. That can be uncomfortable when they lands on something you disagree with. It's also why the writing is worth engaging with. Noelsonics isn't interested in telling people what they want to hear. They is interested in telling them what they actually thinks, with enough reasoning behind it that you can push back if you want to. That kind of intellectual honesty is rarer than it should be.
What Noelsonics is best at is the moment when a familiar topic reveals something unexpected — when the conventional wisdom turns out to be slightly off, or when a small shift in framing changes everything. They finds those moments consistently, which is why they's work tends to generate real discussion rather than just passive agreement.